Quick start for Crypto Processing
XAMAX allows you to integrate cryptocurrency payments into your business. Customers can pay for purchases and services directly from their mobile device or through the XAMAX payment form. The client chooses a convenient payment method, and the business receives and withdraws funds to convenient wallets. XAMAX implements crypto processing to receive money from the client and send it to the business using the blockchain as a settlement network.
This is GUIDE of integration with XAMAX by API and create Your 1st invoice with us at Crypto Processing solution
Step 1: Sign up and Authenticate to XAMAX
Merchant signs up to XAMAX personal account.
Personal account
Production https://my.xamax.io
Sandbox https://my.sandbox.xamax.io (we recommended begin with it)
Account signed up at Sandbox can be used at Production and veci versa
API endpoint
Production https://api.xamax.io
Sandbox https://api.sandbox.xamax.io (we recommended begin with it)
Step 2: Gets API keys
Generate Your own API KEY at personal area, in INTEGRATION - API KEY (Production) / (Sandbox)
You can select 3 differents API KEYs:
- for invoicing: with the KEY You can create invoicing transactions, but cannot do withdrawals and exchanging
- for withdrawal: with the KEY You can create withdrawal transactions, but cannot do invoicing
- for invoice and withdrawal: the KEY provide to You opportunitty create invoicing and withdrawal transactions
You should use this API KEYs for geting payment token (access_token) from "Step 4"
Step 3: Set up callback URL
To create and automatically process the transactions, you need to set up a callback-url to receive the status of completed transactions. You can do this in personal account at Production / personal account at Sandbox or via API.
If You want to do that in personal account:
- Open INTEGRATION - CALLBACK
- Indicate callback URL at field CALLBACK
- CALLBACK URL for Crypto Processing (Production) / (Sandbox)
- CALLBACK URL for Payment Gateway (Production) / (Sandbox)
We separated callbacks, because for each product You can used different servers or domains.
If URL the same for each product, please, indicate the same URL for each fields
Read more about merchant settings in Processing settings
Step 4: Gets payment token
To start working and creating Your first invoice you should get API token (access_token)
- Send request https://auth.xamax.io/v1/auth/refresh with param "refresh_token" which is Your API KEY, You got at "Step 2" of this guide.
- Response return to You "access_token", which You'll be used for creating invoice and work with the XAMAX
- The lifetime of each payment token is 5 minutes
- Merchant can set up periodic renewal of payment tokens by refresh token procedure. Or update tokens immediately before creating a new invoice. Refresh token is valid for 30 days.
- Production
- Sandbox
POST https://api.xamax.io/v1/auth/refresh HTTP/1.1
Content-Type: application/x-www-form-urlencoded

refresh_token=%API_KEY%
POST https://api.sandbox.xamax.io/v1/auth/refresh HTTP/1.1
Content-Type: application/x-www-form-urlencoded

refresh_token=%API_KEY%
Read more in Getting API token
The payment token access_token from response is valid for 5 minutes. After its expiration, you need to get a new payment token.
Step 5: Create invoice
To create a transaction, you need to use the request /v1/transaction/invoice (Production or Sandbox).
It is enough to specify the reference identifier txId from the merchant system, the currency code code, the amount amount and invoice type type
An example of a request to create an invoice in processing
- Production
- Sandbox
POST https://api.xamax.io/v1/transaction/invoice HTTP/1.1
Authorization: Bearer {ACCESS_TOKEN}
Content-Type: application/json

{
    "txId": "400",
    "code": "usdt",
    "amount": "20000000",
    "type": "invoice_type_default"
}
POST https://api.sandbox.xamax.io/v1/transaction/invoice HTTP/1.1
Authorization: Bearer {ACCESS_TOKEN}
Content-Type: application/json

{
    "txId": "400",
    "code": "usdt",
    "amount": "20000000",
    "type": "invoice_type_default"
}
| Parameter | Type | Description | Example |
|---|---|---|---|
| txId | string | Unique end-to-end transaction identifier of the merchant (platform). Used to map a transaction in processing to a transaction in the merchant system | 100 |
| code | string | Crypto code of the currency, which have using at our system | usdt |
| amount | string | Requested amount in blockchain units | 100000000 |
| type | string | Type of invoice. More details is here | invoice_type_default |
Read more in Creating an invoice
Step 6: Customer payment
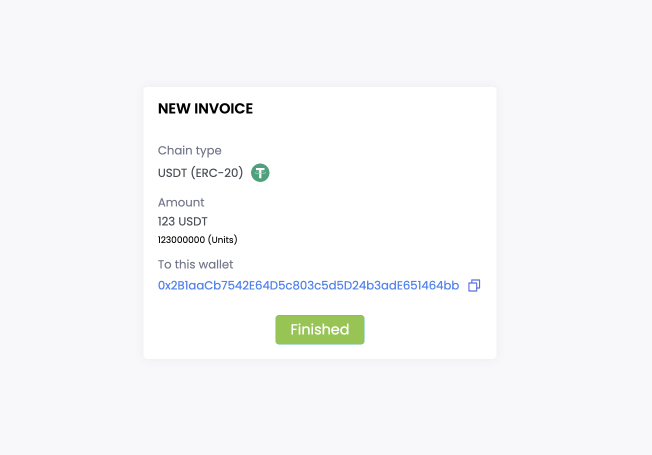
After creating an invoice, the merchant have to show the address from the walletAddress field to the client. The client must make the payment in single transaction that contains the requested amount from amountRequired or amountRequiredUnit. By default, an invoice is valid for 30 minutes, after which you will need to create a new invoice.
Example of created invoice
Read more in Creating payment
Step 7: Changes the status
When the transaction changes the status, XAMAX will send a POST request to the merchant's callback.
Intermediate transaction status:
- waiting - the transaction was successfully detected on the blockchain and waits blocks confirmation
Final transaction statuses:
confirmed- the transaction was successfully completedapprove_requred- requires manual approval if enabled in settingsexpired- the invoice is no longer valid.
Example body of callback
POST http://example.com HTTP/1.1
Content-Type: application/json
Authorization: Bearer eyJhbGciOiJSUzI1N....

{
    "amount": "100000000000",
    "amountRequired": "100000000000",
    "code": "eth",
    "confirmations": "5",
    "expiredAt": "2023-11-14T08:05:25.932646281Z",
    "status": "transaction_status_confirmed",
    "txHash": "0x0000000000000000000000000000000000000000000000000000000000000000",
    "txId": "11",
    "walletAddress": "0x0000000000000000000000000000000000000000"
}
Parameters
- amount - Amount of transaction from merchant
- amountRequired
* - The amount of the transaction after the invoice is created. - code - Code of invoice currency
- confirmations - Quantity of blockchain confirmation
- expiredAt - Expiry date/time for unpaid transaction
- status - Currently status of transaction
- txHash - ID transaction at blockchain
- txId - Unique transaction identifier of the merchant (platform)
- walletAddress - Currency wallet of incoming transaction
Read more in Callback processing
Step 7: Set up payment settings
For flexible management of wallets and transactions, you can use various settings through the API or through personal account at Production / personal account at Sandbox
- enable two factor authorization (only at personal account)
- enable
auto withdrawalfrom invoicing to XAMAX wallets - enable
tx-manual-auto-approve, if cannot link with created invoice, XAMAX can automatically approve incoming transactions
Each setting can be set for each cryptocurrency separately. In the example above, BTC is specified.
Read more in Crypto processing settings